Why Do Most Progress Photos Fail?
Progress photos are only useful when capture conditions are consistent across check-ins. Most lifters compare images with different lighting, distance, and posture, then misread noise as body composition change.
A better camera does not solve this. Standardization solves this. If the protocol changes every week, the comparison reflects setup noise more than body change.
This is why scale weight and mirror impressions often conflict with photos. The photos are not lying, but the capture conditions are changing faster than your physique.
Treat progress photos like testing, not social content. The goal is decision-quality feedback, not random snapshots.
1 protocol
Use one repeatable setup for every photo session
3 variables
Lighting, distance, and pose drive most comparison error
Lower noise
Standardization improves confidence in visual trend changes
What Is the Minimum Viable Photo Protocol?
Pick a fixed day and time each week or every two weeks. Consistent timing reduces variation from hydration, meals, and training pumps.
Capture under the same lighting source with the same camera position. Mark floor position and device height once, then reuse it every session.
Use the same clothing and the same neutral posture each time. Small posture differences can create fake visual changes in waist, shoulders, and glutes.
Take front, side, and back views in the same order. Sequence consistency helps you compare image sets faster and more accurately.
Weekly or biweekly
Cadence that balances signal quality with visible change pace
3 views
Front, side, and back capture a complete physique snapshot
Fixed setup
Keep camera height and position identical every session
Which Posing and Framing Standards Keep Comparisons Honest?
Your default pose should be relaxed and repeatable. Avoid aggressive flexing if your goal is longitudinal comparison rather than one-off presentation.
Frame your full body in each shot with consistent headroom and foot placement. Cropped framing hides changes and introduces false proportion shifts.
Keep camera angle neutral. A low angle can exaggerate lower-body size, while a high angle can flatten shape and understate progress.
If you use a guided overlay, treat it like a template. Matching posture anchors across dates is what turns photos into usable data.
Neutral pose
Improves repeatability and reduces presentation bias
Full frame
Capture head-to-toe to preserve proportional context
Same angle
Camera angle drift can mimic physique changes that are not real
When and How Should You Interpret Photo Changes?
Expect meaningful visual trends over weeks, not days. Daily fluctuations in glycogen, sodium, and stress can change look without changing tissue.
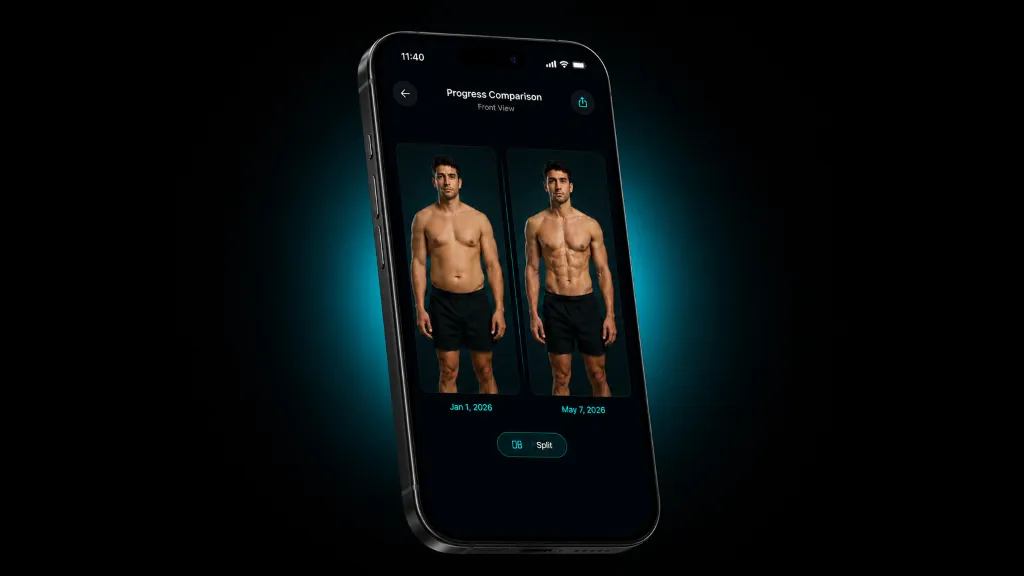
Use side-by-side comparisons between consistent intervals, such as week to week or month to month. Random date selection can obscure progression.
Interpret photos with context from training output and body measurements. Visual change plus stable or improving performance is usually a strong signal.
Do not overreact to one flat week. Trend interpretation should reward consistency, not perfection.
2-4 weeks
Typical window where visual trends become easier to detect
Side-by-side
Comparative viewing improves decision speed and confidence
Context first
Pair photos with performance and measurements for clarity
How Should You Pair Photos With Training Data?
Photos show what changed. Training logs explain why it changed. Combining both prevents false narratives about body composition and performance.
If photos improve while key lifts remain stable in a cut, that is usually a positive outcome. If photos and performance both regress, adjust faster.
Track waist, body weight trend, and key exercise progression alongside photos. This creates a complete picture of fat loss, muscle retention, and training quality.
When signals disagree, investigate execution quality and recovery before rewriting the whole program.
3 companions
Photos + body measurements + lift trends create stronger insight
Faster diagnosis
Combined data narrows causes of stalls or regressions
Better adjustments
Program changes improve when they are evidence-linked
How Should You Handle Privacy, Storage, and Workflow?
A good protocol is useless if you cannot stick to it. Build a workflow that reduces friction: fixed reminders, consistent naming, and fast review cadence.
Store photos in chronological order and use clear labels that include date and view. This reduces review time and prevents accidental comparison errors.
Privacy matters, especially for body-image-sensitive tracking. Use secure storage and avoid workflows that force public posting to maintain consistency.
Automation helps. Guided capture and structured comparisons remove decision fatigue and make consistency easier over long timelines.
Low-friction workflow
Simple routines increase adherence and data quality
Date-labeled sets
Consistent naming prevents comparison mistakes
Private tracking
Progress tracking should not require public exposure
What Is the Bottom Line on Progress Photos?
Progress photos can be one of the best physique-tracking tools for lifters, but only when setup variables are controlled. Standardization turns visual check-ins into actionable evidence.
Use a repeatable setup, fixed cadence, and side-by-side comparisons. Pair visuals with performance and measurement trends before making programming decisions.
If you do this consistently, photos become less emotional and more actionable. You can see what is changing, what is not, and when to adjust.
This article is educational and not medical advice. If body-image concerns or health symptoms are affecting wellbeing, seek support from qualified professionals.
Standardize
Control setup variables before interpreting outcomes
Compare consistently
Use matched time intervals and matched views
Act on evidence
Adjust training from trends, not isolated impressions